SwiftがさわってみたくてとまチョップスタンプをSwiftで作り直しているのですが、ちょっと吹き出しの形の絵を使いたくなりまして…
でもiPhoneの大きさがたくさん増えたので直接UIImageViewとかに画像を入れるわけにもいかないんですよ。
そこで思い出したのが、いつか見たイラレのベジェ曲線を自動でUIbezierPathに変換してくてるスクリプトです。
その頃は、あー誰かPhotoshopで同じの作ってくれないかなー程度に思っていたのですが、この間.jsxを触ったばかりなのでこれ自分で作れないか、と。
(吹き出しならpopOver使えよというツッコミはなしです)
で、例のごとくリファレンスのようなものを見ながらいじっていたわけですが、まあ分からないんですよ。
全部英語なんですよ。パスの取得すら危うい。
====
とりあえず、
activeDocument.pathItems[].subPathItems[].pathPoints[].anchor[]
activeDocument.pathItems[].subPathItems[].pathPoints[].rightDirection[]
activeDocument.pathItems[].subPathItems[].pathPoints[].leftDirection[]
と入っていけばアンカーポイントは取れるっぽかったのでいじってみました。
これでごちゃごちゃ点を一つずつとっていってSwiftの構文に当てはめるだけ!
…と思ったのですがそうは問屋が卸しませんよ。
Photoshopって一つのアンカーポイントにつきコントロールポイントが二個ついてるんですよ。
でもSwiftは、一つの辺につきコントロールポイントを二つ持っているんですよ。
つまり下の図のように!
▼Swift
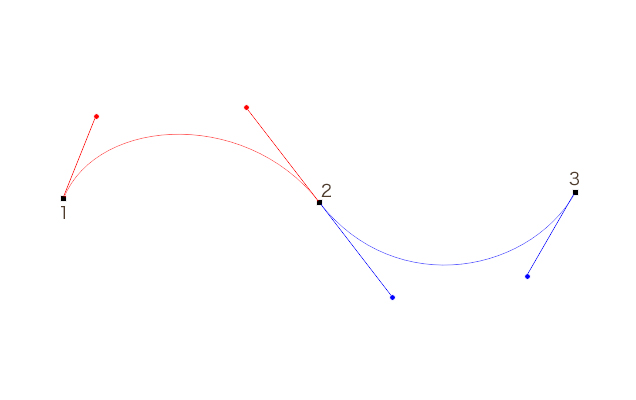
▼Photoshop
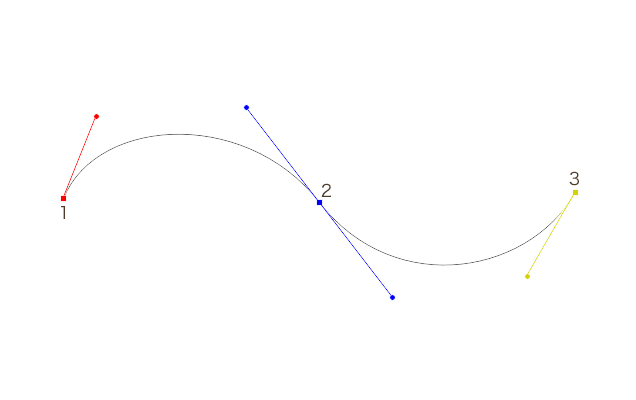
Photoshopで「二つの点をつなげて曲線を作ったー」
と思っていたら実は
Swiftでは「一つ辺を書いて曲げたー」
という意味だったってことなんですよ
プログラム的には、何て厄介なことしてくれたんだ、ということですよ
for文の一番最初と最後で分岐して…という作業が増えるわけですから。
…ではSwiftでUIBezierPathを描く方法に当てはめていきましょう。
let path : UIBezierPath = UIBezierPath();
path.moveToPoint(CGPoint);
path.addCurveToPoint(CGPoint, controlPoint1: CGPoint, controlPoint2: CGPoint);
path.closePath();
こんな感じですかね
エラー処理を加え、お節介なstroke()とfill()を入れ、横書きパラグラフ文字ツールで表示するようにして完成です。
こんな感じになりました
変換したいパスを選択してスクリプトを実行するとUIBezierPathのコードに変換します。
// Only run if we're in a supported version of Photoshop
// Note, removing this will not make the script work, as it depends on
// core application code, it just makes it fail better.
if (!app.featureEnabled("ImageStack Creation")) {
	throw (new Error(localize("$$$/JavaScripts/Statistics/CommandNotAvailable=The Statistics feature is not available in this version of Photoshop.")));
}

try{
	makePath();
}catch(err){
	alert(err);
}

function makePath(){
//	preferences.rulerUnits = Units.PIXELS;
	height = activeDocument.height.value
	width = activeDocument.width.value
	var str="//let height : CGFloat = "+String(height)+";\n";
	str += "//let width : CGFloat = "+String(width)+";\n";
	if(activeDocument.pathItems.length == 0){
		throw "パスを選択してください。";
	}
	for(var i=0; i<activeDocument.pathItems.length; i+=1){
		var activePath = activeDocument.pathItems[i];
		str += "let "+activePath.name+" : UIBezierPath = UIBezierPath();\n";
		for(var j=0; j<activePath.subPathItems.length; j+=1){
			for(var k=0; k<activePath.subPathItems[j].pathPoints.length; k+=1){
				var activePathPoints = activePath.subPathItems[j].pathPoints;
				if(k==0){
					str += activePath.name+".moveToPoint(CGPoint(x: "+String(activePathPoints[k].anchor[0])+", y: "+String(	activePathPoints[k].anchor[1])+"));\n";
//					str += activePath.name+".moveToPoint(CGPoint(x: "+String(activePathPoints[k].anchor[0])+", y: "+String(height-	activePathPoints[k].anchor[1])+"));\n";
				}else{
					str += activePath.name+".addCurveToPoint(CGPoint(x: "+String(activePathPoints[k].anchor[0])+", y: "+String(activePathPoints[k].anchor[1])+"),\n";
					str += "controlPoint1: CGPoint(x: "+String(activePathPoints[k-1].leftDirection[0])+", y: "+String(activePathPoints[k-1].leftDirection[1])+"),\n";
					str += "controlPoint2: CGPoint(x: "+String(activePathPoints[k].rightDirection[0])+", y: "+String(activePathPoints[k].rightDirection[1])+"));\n";
//					str += activePath.name+".addCurveToPoint(CGPoint(x: "+String(activePathPoints[k].anchor[0])+", y: "+String(height-activePathPoints[k].anchor[1])+"),\n";
//					str += "controlPoint1: CGPoint(x: "+String(activePathPoints[k-1].leftDirection[0])+", y: "+String(height-activePathPoints[k-1].leftDirection[1])+"),\n";
//					str += "controlPoint2: CGPoint(x: "+String(activePathPoints[k].rightDirection[0])+", y: "+String(height-activePathPoints[k].rightDirection[1])+"));\n";
				}
			}
				str += activePath.name+".addCurveToPoint(CGPoint(x: "+String(activePathPoints[0].anchor[0])+", y: "+String(activePathPoints[0].anchor[1])+"),\n";
				str += "controlPoint1: CGPoint(x: "+String(activePathPoints[activePath.subPathItems[j].pathPoints.length-1].leftDirection[0])+", y: "+String(activePathPoints[activePath.subPathItems[j].pathPoints.length-1].leftDirection[1])+"),\n";
				str += "controlPoint2: CGPoint(x: "+String(activePathPoints[0].rightDirection[0])+", y: "+String(activePathPoints[0].rightDirection[1])+"));\n";
		}
	}

	str += activePath.name+".closePath();\n"
	str += "//UIColor.blackColor().setStroke();\n"
	str += "//"+activePath.name+".lineWidth = 2.0;\n"
	str += "//"+activePath.name+".stroke();\n"
	str += "//UIColor.redColor().setFill();\n"
	str += "//"+activePath.name+".fill();\n"

	txtLayer = activeDocument.artLayers.add();
	txtLayer.kind = LayerKind.TEXT;
	txtLayer.textItem.kind = TextType.PARAGRAPHTEXT;
	txtLayer.textItem.contents = str; //文字列
	txtLayer.textItem.position = Array(10, 30); //位置 Array(x, y)
	txtLayer.textItem.width = "100 px";
	txtLayer.textItem.height = "100 px";
	txtLayer.textItem.size = 3; //フォントサイズ

	//alert(str);
}
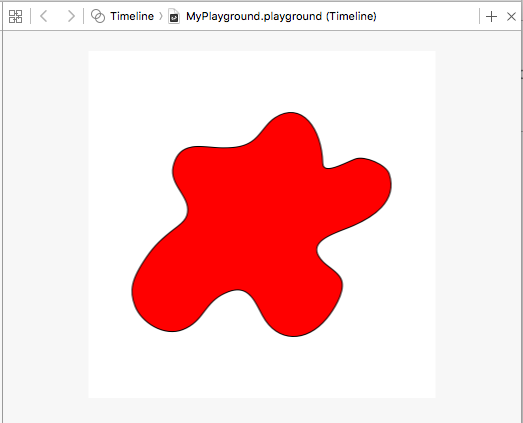
こんなかんじになりました

試しにPlayGroundで見てみます
import UIKit
import XCPlayground
class Test : UIView {
    override func drawRect(rect: CGRect) {
//Photoshopからコピペ
    }
}
let test : Test = Test(frame: CGRectMake(0,0,347, 347));
test.backgroundColor = UIColor.whiteColor();
test.drawRect(test.frame)
XCPlaygroundPage.currentPage.liveView = test
うまくいっているようです(が、let test : Test = Test(frame: CGRectMake(0,0,347, 347));がまだ気になります。→気にしないことにしました。)
あとはCGAffineTransformScaleで大きさを調整すれば完成ですかね〜